Had to take a break on the Girls' Clubhouse project for a few days. I needed to finish organizing everything (and I do mean everything) in my classroom so I can really enjoy my summer break. Whew - it's all done. Worked until Saturday at 6:00, but I'm finished! YEAH!
Okay, so bringing us back to the floor of the clubhouse.
I knew I wanted a big sponge to make this as simple as possible and so Baby Bee could do a lot of this project herself. Of course I couldn't find a square sponge, but Worker Bee did find a nice big dense sponge at our local Ace Hardware. However, it was a rectangle.
So here's how I made it a square:
1. I measured across several times and marked it so I could connect the marks to make a nice edge. Then I took a sharpie (Can you believe the only color I could find was brown? Who can only find a brown sharpie??? Me I guess!) and connected those marks so I would cut a straight line.
 |
| (photo by Worker Bee) |
2. Then I used my exacto knife to get a crisp clean edge. Below that edge I didn't care how raggedy it looked.
 |
| (photo by Worker Bee) |
3. Then I labeled the WRONG SIDE (in brown still) so we wouldn't load any paint on that jaggedy side.
4. See? At the top there is a nice straight edge, but down the side it's just a jumbled, raggedy, jaggedy mess.
Now to proceed to the painting. It's just the clubhouse and the floor isn't level, it's plywood, etc., etc., so I knew there was no way it was ever going to be perfect, but we could still make it look pretty good.
1. First thing we did was find the middle of the floor from side to side. The floor in this case was 63 1/2 inches wide so we drew marks every 31 3/4 inches down the center of the floor. Then Worker Bee had to come out to help us draw the line (we couldn't hold the tape measure and draw at the same time) and he connected all those marks and we had a line going down the middle of the floor. Hope that all makes sense.
2. I knew I wanted to paint these on the diagonal so we placed the first one with the top and bottom point centered on that line. I continued following that line down the center of the floor.
(Baby Bee and I both loved how imperfect it looked but we still had the brightness on the floor we were looking for.)
3. I thought about drawing lines across, but we decided to free hand it instead. So I then stamped my square sponge all the way across the back, making sure the top point was right up next to the wall and that the side points lined up too.
4. Then we proceeded to move along matching point to point.
5. The edges were a bit of a problem. I didn't want to cut the sponge in half yet to do those so I tried making them right up against the edge of the wall with some cardboard protecting the white wall. They turned out sort of okay, but not that great really. They were of the squint variety - you know - you squint at it and it looks doggone good but quit squinting and you see how it didn't work. So we decided to finish the rest of the floor, let it dry and then cut the sponge to finish. (More on that in a bit.)


6. It's getting hot and we're getting lazy so we decided that the floor looked perfectly fine without it going all the way to the edge of the walls. Look at the left side to get a better idea of what I mean and then look at the right side to see those messy half triangles. So I think we're going to just go in and paint back over the 4 half triangles in our white base coat and be done with it. (Unless I hear a howl of protests from you guys - be sure to let me know if you think we really should go all the way to the edge - but I might not listen anyway 'cause it's hot and it's summer and we want this done!)
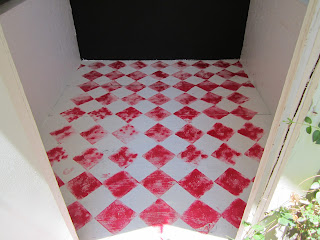
7. Voila! Red and white checkerboard floor. Took about 1 hour for the first base coat (cause it needed three coats of the white), about 15 minutes to prep the materials, and about 30-45 minutes to paint the floor (that's total time - we had to take a break to let a bit of paint dry before we could do the section right up by the door). Oh yes, better add 15 more minutes for base coat touch ups (especially since I - yes me, not Baby Bee - stepped in wet paint and there are partial footprints on that floor too).
Still don't have fabric - didn't have a chance to get any in the big city - but we'll be back up there tomorrow.
Thanks for buzzing along with us as we work on this project. Can't wait to have it done. I think we'll be done with all the big projects by 4th of July and then it will just be some sewing projects to finish it off.
It sure was a treat to see you today!
(I'm making a dark chocolate iced mocha to enjoy this afternoon - care to join me?)